
Most regrets about a new patio aren't about the paving. They're about the size — too small for the table once the chairs are pulled out — or the position, which turns out to be in shade by four o'clock on exactly the evenings you'd want to sit outside. Both are decided before anyone quotes, and neither is easy to change afterwards.
So it's worth spending an afternoon on the decisions below before you start collecting quotes for patio installation. None of them requires a designer, and getting them right costs nothing.
Start with how you'll use it, then size it
Work out what has to fit, then add the space around it. This is where patios most often come up short, because people size for the furniture rather than for the furniture in use — a chair pulled back from a table needs roughly a metre behind it, and someone needs to be able to walk past.
- A four-seat table and chairs needs somewhere around 3m by 3m to be comfortable in use, not just to stand on the paving.
- A six- to eight-seat table wants nearer 3.5m by 4m, and more if people will be walking around it.
- A pair of loungers or a small seating set works in about 3m by 2.5m.
- A barbecue or outdoor kitchen run needs its own strip, ideally not in the route between the back door and the table.
- If the patio is also the path to the shed or the side gate, add that route rather than expecting people to walk round the table.
The cheapest way to test this is to put the actual furniture out on the lawn where the patio will go, sit in it, and walk around it. An hour doing that is worth more than any amount of drawing.
One more thing worth knowing: smaller patios cost more per square metre, because the fixed costs — set-up, plant hire, getting spoil away — are spread over less area. If you're hovering between 14m² and 18m², the larger one often costs less per square metre than you'd expect. The patio installation cost guide covers why.
Where to put it
The default is straight outside the back door, and for a lot of gardens that's right — it's convenient, it's a natural extension of the kitchen, and it keeps the run for materials short. But it isn't automatically where the sun is.
Spend a weekend watching where the light falls at the times you'd actually use the garden. A patio at the far end of a north-facing garden often catches evening sun that the area by the house never sees. The cost of being wrong here is high and permanent, and the cost of checking is a weekend.
- Sun at the hours you'll use it — late afternoon and evening matter more than midday for most households.
- Shelter from the prevailing wind, which in most of the UK comes from the south-west. A patio in a wind funnel between two buildings is unusable on the days you'd want it.
- Trees. Shade is one thing; what the tree drops is another. Limes and sycamores drop sticky honeydew, and anything overhanging means leaf litter in the joints every autumn.
- Distance from the house. A patio away from the back door needs a path to it that works in the wet and the dark.
- What you'll be looking at, and what will be looking at you — a patio raised even slightly can change the sightlines into a neighbour's garden.
- Where the water currently goes. The low corner of a garden is where water already collects, and paving it doesn't change that.
The two levels that matter
If you only take two technical points from this guide, take these. They're the things a good installer will raise unprompted, and the things a bad one won't.
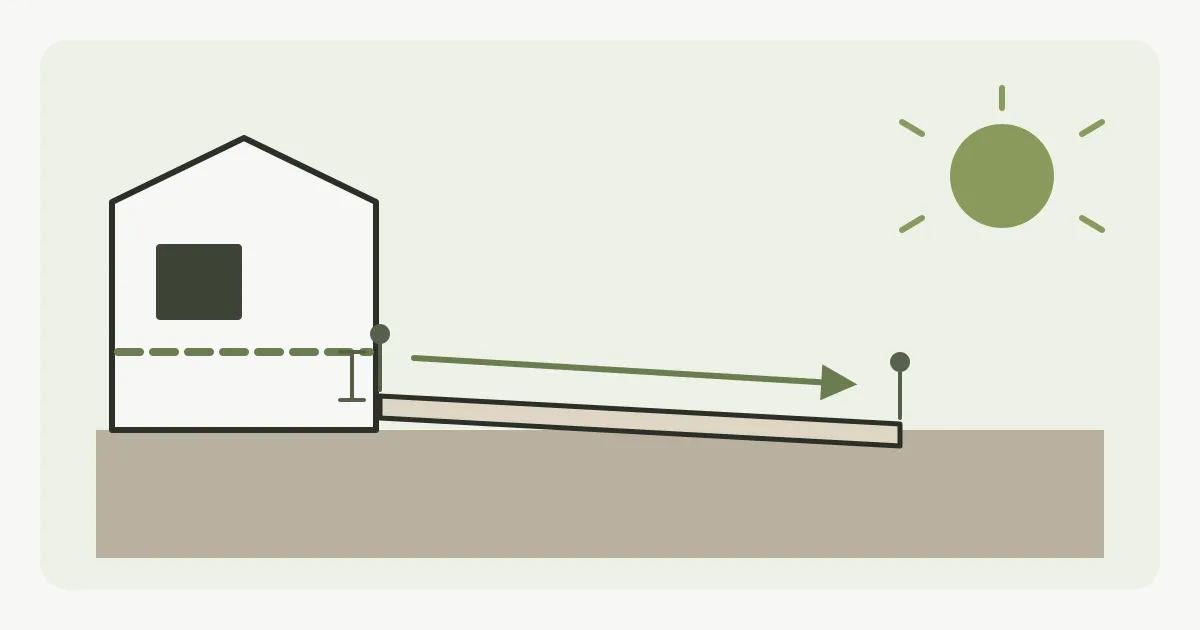
The first is the damp-proof course. Look at the wall of the house and you'll find a horizontal line in the brickwork, usually a couple of courses above ground level. A patio against the house is normally specified to finish at least 150mm — two brick courses — below that line, so rain splashing off the paving and water sitting on it can't bridge into the wall. Building a patio up too close to the DPC is one of the more expensive mistakes in this trade, because the damage shows up inside the house.
The second is the fall. A patio is never laid flat. It's laid with a slight, deliberate slope away from the house — commonly around 1 in 80, which is roughly 12mm over every metre — so that water runs off rather than sitting. It's barely perceptible underfoot and it's the difference between a patio that dries out after rain and one that grows algae in the same spots every winter.
Where the water goes once it's run off is the third part of the same question. If there's an obvious route — a lawn, a border, an existing gully — the fall alone may be enough. If there isn't, patio drainage is designed in at the same time. Doing it now is far cheaper than retrofitting it into a finished patio, which the patio drainage cost guide sets out.
Choosing a material
Material is the single biggest lever on the budget, and mostly a matter of what you want to live with:
- Concrete flags are the budget option and have come a long way — they're the reason a patio can start at around £90 per square metre installed.
- Indian sandstone is the long-standing British default: natural, warm, plenty of colour variation, typically £130 to £200 per square metre installed. It's porous, so it's generally sealed. See the Indian sandstone patio cost guide.
- Porcelain is the low-maintenance choice — non-porous, colour-consistent, never needs sealing, typically £165 to £230 per square metre installed. See the porcelain patio cost guide.
Whatever you're drawn to, get physical samples and look at them outside, wet, in your own garden. Paving looks entirely different under showroom lighting than it does on a grey Tuesday against your house brick, and almost every patio in Britain spends a good part of the year wet.
Access, deliveries and spoil
This is the part nobody plans for and the part that most often surprises people on a quote. A patio involves several tonnes of material going in and, usually, several tonnes of soil and old paving coming out.
If there's a side gate wide enough for a wheelbarrow, all of that is straightforward. If there isn't — a terrace, a garden reached only through the house, a gate too narrow — then every barrow load is carried by hand through the kitchen or lifted over a wall. That's a real cost, it can add a day or more to the job, and it's worth raising yourself when you ask for quotes rather than leaving it to be discovered.
- Measure the narrowest point on the route from the road to the patio area.
- Work out where a grab lorry or a tipper could park, and whether that needs a permit on your street.
- Decide where materials can be stacked for a few days without blocking the house.
- Ask explicitly whether spoil removal is included — it's the item most often left out of a low quote.
When to book
Patios are laid all year round in the UK, but not equally easily. Mortar and most jointing compounds need dry conditions above a minimum temperature to cure properly, so a hard frost or a sustained wet spell stops jointing even when the rest of the work can continue. Excavation in saturated ground is slower and messier.
Spring and early summer are the busiest months, and good local contractors are often booked weeks ahead by then. If you want the patio for the summer, getting quotes in late winter is the practical move — you'll have more choice of installer and more room to negotiate than you will in May.
Before you ask for quotes
Have these ready and every quote you get back will be more accurate and easier to compare:
- The rough dimensions and area of the patio you want.
- A shortlist of one or two materials, ideally with samples you've already looked at outside.
- Photos of the access route and the narrowest point on it.
- What's there now — lawn, an old patio, concrete, borders — since that determines excavation and spoil.
- Whether there's an existing drainage point nearby, and where water currently goes after rain.
- Anything else you want done at the same time: steps, edging, a path to the shed, lighting ducts run under the paving before it's laid.
Excavation, spoil removal, sub-base, bedding, the paving, edging and jointing should each be a line rather than a single price per square metre. That's the only way to see what's genuinely different between two quotes — and it's how you spot that a cheaper one has left out getting the soil away. Checking a contractor's credentials before you commit is worth the ten minutes too; TrustMark is the government-endorsed scheme for home improvement work.
Does a patio need planning permission?
In the vast majority of cases, no. A garden patio built at or near existing ground level is normally treated as permitted development. What can change that is raising the ground level significantly — particularly close to a boundary or a neighbour's wall, where party wall and overlooking considerations come in — or a property in a conservation area or within the curtilage of a listed building. Rules also differ between England, Scotland, Wales and Northern Ireland. The Planning Portal is the starting point, and a quick call to your local planning department will confirm your own case before you start.
Once you've settled size, position and material, the patio cost calculator will give you a rough budget to work to. And if what you actually have is an existing patio you're not sure is past saving, start with whether to repair, repoint or replace your patio instead — it may not need replacing at all.
How to plan a new patio
- Work out what has to fit on it
List the furniture and anything else the patio has to hold — table and chairs, loungers, a barbecue, the route to the shed. Put the actual furniture out on the lawn, sit in it and walk around it to see how much space it really takes in use.
- Watch where the sun falls
Over a weekend, note where the light is at the times you'd use the garden, especially late afternoon and evening. Check for shelter from the wind and for trees that will drop leaves or sap onto the paving.
- Mark the area out
Peg string lines or lay a hosepipe around the shape and size you've settled on, then live with it for a few days. Measure the marked area and note the longest and widest points.
- Find the damp-proof course
Locate the horizontal DPC line in the house wall. The finished patio should sit at least 150mm — around two brick courses — below it, so note how much fall in ground level you have to work with.
- Work out where water will go
After heavy rain, look at where water currently collects and where it drains away. If there's no obvious route away from the patio area, plan drainage in from the start rather than adding it later.
- Get samples outside
Order physical samples of one or two materials, lay them in the marked-out area, and look at them wet and dry against your house brick before deciding.
- Check the access route
Measure the narrowest point between the road and the patio area, and work out where a delivery lorry could park and where materials can be stacked.
- Get two or three itemised quotes
Ask each contractor to break down excavation, spoil removal, sub-base, bedding, paving, edging and jointing as separate lines, and to state what isn't included.
Frequently asked questions
How big should a patio be?
Size it around what has to fit on it in use, not just what will stand on it. As a guide, a four-seat table and chairs wants roughly 3m by 3m, and a six- to eight-seat table nearer 3.5m by 4m, since chairs need about a metre behind them once someone is sitting down. Add any route that crosses the patio to the shed or side gate.
How far below the damp-proof course should a patio be?
A patio against the house is typically specified to finish at least 150mm — around two brick courses — below the damp-proof course, so that water splashing off the surface can't bridge into the wall. If existing ground levels make that difficult, it's something to raise with your installer at the quote stage rather than after work has started.
What's the best time of year to have a patio laid?
Late spring through early autumn is easiest, since mortar and jointing compounds need dry conditions above a minimum temperature to cure. The practical move is to get quotes in late winter, before the spring rush — good local contractors are often booked weeks ahead by May, and you'll have more choice and more room to negotiate earlier in the year.
Do I need planning permission for a patio?
Usually not. A garden patio at or near existing ground level is normally permitted development. Raising the ground level significantly, particularly near a boundary, can bring party wall or overlooking considerations into play, and listed buildings and conservation areas need extra checks. Rules differ across the UK nations, so confirm with your local planning department if you're at all unsure.
Ready to talk to a patio installation specialist?
Get Free Quotes →