
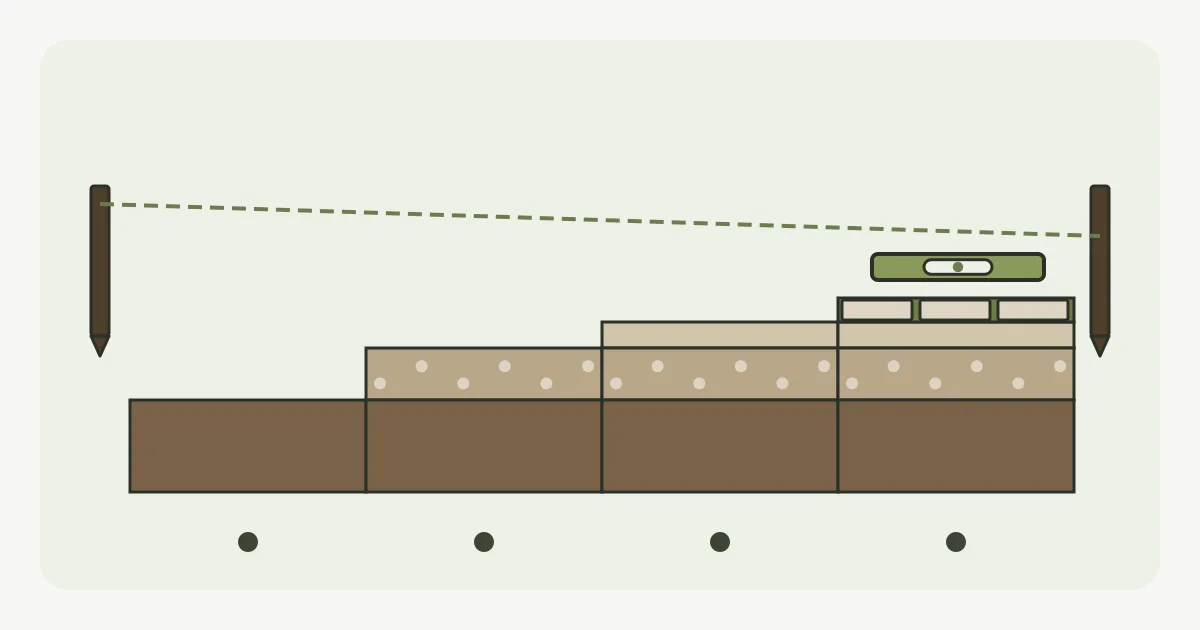
Most of what decides whether a patio is still flat in ten years is buried by the end of the second day. Once the slabs are down you can't see the sub-base, you can't see how full the bed under each slab is, and you can't easily check the fall. That's why this guide is less about how to lay a patio yourself and more about knowing what should be happening on your lawn, so you can ask for it in writing before anyone starts digging.
The process is broadly the same whatever goes on top. A new patio in concrete flags, a porcelain patio and an Indian sandstone patio all start with the same excavation and the same compacted base. The differences come at the bedding stage, and they matter.
1. Digging out: how deep is deep enough?
The dig depth is the three layers added together: sub-base, bed and slab. For a garden patio that only takes foot traffic, a common specification is around 100mm of compacted sub-base, 30–50mm of mortar bed and the slab itself, which might be 20mm porcelain or anything from 15mm to 35mm of hand-cut sandstone. That puts the typical dig somewhere around 150–200mm below the finished level.
Those figures are a starting point. Soft ground, clay that's been churned up by building work, or made-up ground full of old rubble will usually need a deeper sub-base, sometimes 150mm or more, and a decent installer will decide that once the topsoil is off and they can see what they're standing on. A hot tub or a heavy outdoor kitchen changes the specification again, which is why the intended use belongs on the quote request.
All the topsoil and any organic matter should come out. Turf left in place rots, and the paving above it sinks with it. Where the patio meets the house, the dig is set from the damp-proof course down: the finished surface is normally kept at least 150mm below it. Our guide to planning a new patio covers how that level is worked out.
2. The sub-base: compacted in layers, not dumped
The sub-base is crushed stone, usually a graded aggregate sold as MOT Type 1 or something close to it, spread and compacted with a vibrating plate. The detail people miss is that it goes down in layers. One pass of a plate compactor only firms up the top part of a thick, loose layer, so a 150mm sub-base tipped in one go and run over once is softer underneath than it looks. Layers compacted in turn are what stop slabs dropping a year later.
Some installers lay a geotextile membrane under the sub-base. It isn't a weed barrier in the way people often assume (weeds in a patio nearly always grow down into the joints from above, not up from below). Its real job is to keep the stone from being pushed down into soft soil. On firm ground it's optional; on soft or clay ground it's worth having.
The fall goes in at this stage, not later. If the sub-base is flat and the installer tries to create the slope with the bed alone, the bed ends up thick at one side and thin at the other, and the thick side tends to settle more.
3. Falls: the slope you shouldn't be able to see
A patio is laid with a slight slope so rain runs off rather than sitting on it. Around 1 in 80 (roughly 12mm per metre) is a common target for smooth porcelain, and riven stone is often laid a little steeper, nearer 1 in 60, because its textured surface holds water in the dips. The fall should run away from the house and towards somewhere the water can go: a lawn, a border, a gully or a channel drain.
Get it right and nobody notices. Get it wrong and you'll see it after the first heavy shower, either as puddles or as a wet stripe along the base of the wall. A patio laid dead level is a common fault on cheaper jobs, and correcting it later means lifting the paving.
4. Bedding: full bed or spots?
This is where the material starts to matter, and where the most common shortcut hides.
- Full mortar bed. Each slab sits on a continuous bed of mortar covering its whole underside, tapped down to level. This is the standard for natural stone and for porcelain, and it's what spreads the load so no single point of the slab takes the weight of a chair leg or a dropped planter.
- Spot or 'dot and dab' bedding. Five lumps of mortar under each slab, one in each corner and one in the middle. It's quicker and uses less mortar. It also leaves voids under the slab where water collects, freezes and pushes, and it's a well-known cause of rocking and cracked slabs. Avoid it on a patio.
- Primer for porcelain. Porcelain is so dense that mortar won't grip it on its own, so the back of each slab is coated in a bonding slurry or primer just before it goes down. Skip the primer and porcelain slabs can come loose from a perfectly good bed.
- Thickness for sandstone. Hand-cut sandstone varies in thickness slab to slab, so the installer adjusts the bed under each one to bring the tops level. Calibrated stone is ground to one thickness and lays faster for that reason.
Mortar shouldn't be laid when frost is forecast. Most installers stop when it's near freezing, because a bed that freezes before it has set loses most of its strength. If your job is booked for winter, ask what they'll do on a cold morning.
5. Jointing: last, and only once the bed has set
The gaps between slabs are filled once the bed has had time to firm up, usually a day or more later. Walking on fresh slabs to point them can knock them out of level. The filling is either a traditional sand and cement mortar pressed in and tooled smooth, or a brush-in jointing compound swept into the gaps. The choice depends on joint width, slab type and how much flexibility you want. The patio jointing compounds comparison goes through the options in detail.
Joints are the part of a patio that wears out first, so this is the stage you'll meet again in ten or fifteen years when the patio needs repointing.
6. Edges and finishing
Where a patio stops against a lawn or border rather than a wall, the outer slabs need holding in. That's usually a haunch of concrete along the outside edge, or a row of edging set in concrete. Without it, the edge slabs slowly creep outwards and drop. Finishing means cleaning off mortar stains before they harden (sandstone in particular marks easily) and, for natural stone, sealing once everything has cured, if sealing is part of the job.
The written spec: what to ask for
What a patio quote should say about each stage, and the shortcut to watch for.
| Stage | Ask the installer to state | The shortcut to watch for |
|---|---|---|
| Excavation | Dig depth, what happens to the spoil, and the finished level against the damp-proof course | Turf or topsoil left under the base |
| Sub-base | Material, compacted depth and that it's compacted in layers | One thick layer, compacted once |
| Falls | Direction and gradient, and where the water ends up | Laid flat, or falling towards the house |
| Bedding | Full mortar bed; primer on every porcelain slab | Spot bedding; primer skipped |
| Jointing | Mortar or the named compound, and when it goes in | Pointing the same day the slabs go down |
| Edges | How open edges are restrained | No haunching against lawn or border |
Before the slabs go down, ask to see the compacted sub-base and the string lines for the fall. It takes the installer two minutes to show you, and it's the only chance you'll get. Most good contractors are happy to; if someone gets defensive about it, that tells you something too.
Most of the price of a patio is in these hidden stages rather than the slabs, which is why two quotes for the same area can be far apart. The patio installation cost guide shows how the figures typically break down.
How a patio is built, stage by stage
- Mark out and set levels
The area is marked out and the finished level is set from the damp-proof course, at least 150mm below it, with the direction of fall agreed.
- Excavate
Turf, topsoil and any organic material are dug out to the depth of sub-base, bed and slab combined, typically around 150–200mm for a foot-traffic patio.
- Build and compact the sub-base
Crushed-stone sub-base is spread and compacted with a plate compactor in layers, with the fall built into it.
- Bed the slabs
Each slab is laid on a full mortar bed and tapped down to level and fall. Porcelain slabs are primed on the back first; uneven sandstone has the bed adjusted under each slab.
- Restrain the edges
Open edges against lawn or border are haunched in concrete or edged so the outer slabs can't creep.
- Joint the patio
Once the bed has set, the joints are filled with mortar or a brush-in compound and the surface is cleaned down.
Frequently asked questions
How deep should a patio sub-base be?
For a garden patio that only takes foot traffic, around 100mm of compacted sub-base is a common specification. Soft, clay or made-up ground usually needs more, often 150mm or deeper, and the installer should decide once they've seen what's under the topsoil.
Can a patio be laid on sand instead of mortar?
Some concrete block paving is designed to be laid on a sand bed, but patio slabs generally aren't. Large flags on sand tend to rock and settle unevenly. Natural stone and porcelain patios are normally laid on a full mortar bed.
How long after laying can I walk on a new patio?
Light foot traffic is usually fine after a day or two, once the bed has set, but furniture and heavy use are best left for longer. Ask the installer, because it depends on the weather and the mortar or jointing compound used.
Do I need a membrane under my patio?
Not always. A geotextile membrane under the sub-base helps on soft or clay ground by stopping the stone sinking into the soil. It won't do much about weeds, which mostly root into the joints from above.
Ready to talk to a patio installation specialist?
Get Free Quotes →